How-To for programmers using Windows who would like to work on Twisted
Mon 12 March 2012
- Twisted, Windows, howto
At the first Sprint night at PyCon 2012, we ran into some trouble setting up Twisted in Windows. Since it has been a very long time since my original notes on how to develop Twisted in Windows, I thought I'd post an updated version.
This how-to is a work-in-progress, and is directed toward newer Python programmers who would like to work on Twisted (hopefully at the next few sprint days!), but I assume the following:
- You know how to download files and install programs in Windows.
- That Python 2.7 is already installed. If not, the Boston Python User's group has a great wiki page on how to do so.
- That you are at least somewhat familiar with using command line, editing and running Python files, etc. If not, again the Boston Python user's group is a great resource.
I did this in Windows XP, but it should be applicable to Windows Vista or Windows 7 as well.
Useful tools you may want before you start this.
These are just the tools that I used, so they will be what you will see in the screenshots, but you can use any alternatives you wish:
7-zip - Useful for decompressing bz2 and gzipped files tar files. Note: if you see a file like "file.tar.gz" or "file.tar.bz2", that means that it is "archived" twice - tar is a container for the files, and gzip and bzip2 compresses that tar container. Just wanted to clarify in case you unzip a "file.tar.gz" and get a "file.tar".
Console2 - a nicer command prompt for windows - there doesn't seem to be an installer, just an executable in a zipped folder.
Sublime Text 2 - my current preferred text editor (the Boston Python Workshop recommends Notepad++)
Dependencies
Install MinGW, which is a GCC compiler for Windows. Download the mingw-get-inst installer. If it asks you for options, you may only need C, and C++, but I just installed everything, including Fortran, and ObjC.
Install pywin32, which are the Windows extensions for Python. Downloadable files are under the tab "Files". Go to the latest build and download the build for your version of windows, for Python 2.7. Install the executable even if you have/are planning on installing virtualenv. I haven't figured out how to install it in a specific virtualenv, and I haven't been able to google up an answer.
Install setuptools (which includes easy_install), which lets you install python extensions via running 'python setup.py' on source packages. Download the latest version for Windows that for Python 2.7 (download the .exe at the bottom of that page) and install it.
Optional, but recommended
Install pip, which manages python packages - it makes getting/installing/removing python packages later a lot easier. These instructions are mostly snarfed from this stackoverflow question):
Download the source (close to the bottom of the page) and uncompress it anywhere (the uncompressed files can be deleted after it is installed)
- On a console, go to the uncompressed pip directory and run install pip:
   cd [pip directory]
   python setup.py install
- (if you haven't already added 'c:\Python27\Scripts' to your PATH environment variable (see the Windows Python setup wiki), do so.
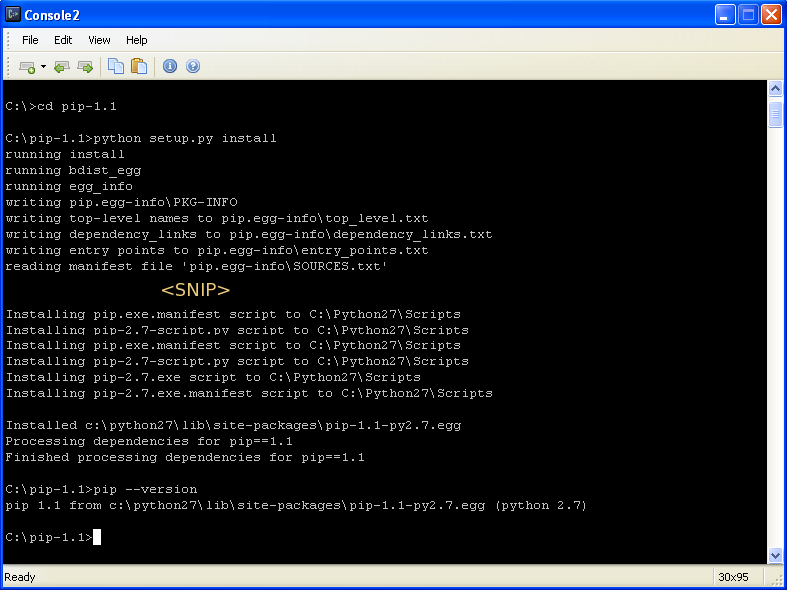
To verify that everything installed correctly, try typing:
pip --version
at the command line. If you don't get an error, then pip has been installed correctly. (In the screenshot, the 'SNIP' just means there was a lot more text that I cut out so as to fit the relevant bits in an image of reasonable size).
Entirely Optional
Virtualenv is something that creates isolated python environments. For instance if you want to work with different versions of packages such as Twisted or Django, it lets you set up environments that are independent of each other, so you don't have to edit your Python path to switch between versions, or do any other hacks. As far as I can tell it works well enough in windows, although some options are not available.
If you haven't already installed pip, do so first.
- Install virtualenv by typing at the command console:
pip install virtualenv
- Set up a twisted virtualenv (virtual environment in which twisted will be run):
- Go to C:\ (or wherever you wish to keep your virtual environments), and create a new virtual environment by typing this at the command line:
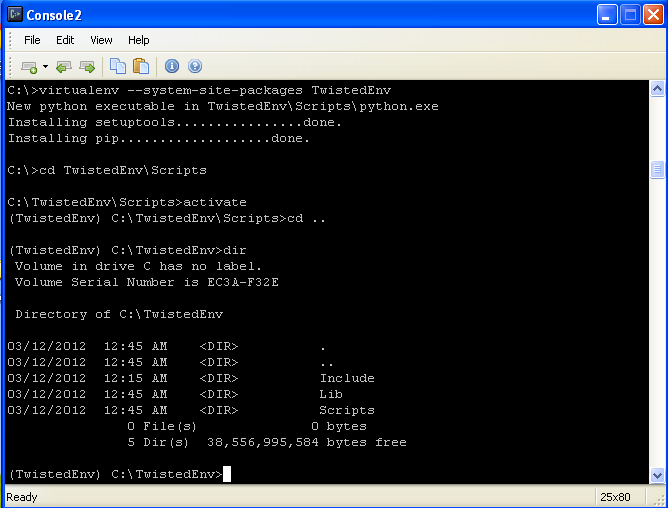
virtualenv --system-site-packages TwistedEnv
(You don't have to name your virtual environment "TwistedDev") Do not forget the "--system-site-packages" option, because otherwise pywin32 will not be installed in this virtual environment.
- This creates a directory (a folder) named "TwistedDev". Go into that directory activate the environment by typing at the command line:
   cd TwistedEnv\Scripts
   activate
- Notice that the prompt now says (TwistedEnv) before the C:\. This means that you are now working in the TwistedEnv virtual environment. Once you are in this environment, if you use "pip install" or "python setup.py install", the python packages will be installed to the TwistedEnv\Lib\site-packages directory, rather than the C:\Python27\Lib\site-packages directory.

Get and install Twisted
-
Get Twisted. Go to http://twistedmatrix.com and download the source archive (make sure to not to download a windows installer). For more advanced users: check out Twisted from SVN instead.
Alternately, if you do not want to actually work on Twisted but just use it, you can do the following (and you can probably skip the rest of the instructions):
easy_install twisted
-
Save and extract it to C:\TwistedEnv\ (or wherever your twisted virtual environment is). If you did not/do not want to install virtualenv, then just extract it wherever (e.g. C:\).
-
"Install" it by typing at the command line (this causes an error, but the solution is after this explanation):
python setup.py develop
Usually the way to install it is 'python setup.py install', but that just copies the relevant files to your site-packages directory. You want to actually work on Twisted itself though, so using 'develop' basically just creates a link in site-packages to your source directory (C:\TwistedEnv\Twisted-12.0.0, or C:\Twisted-12.0.0 if you do not have virtualenv).
You will probably see some vcvarsall.bat errors. This is because distutils\cywgincompiler.py uses a -mno-cygwin, which has been removed from the latest version of mingcw32.
-
Edit twisted's setup.py so that the getExtension function returns an empty list:
Then re-run python setup.py develop
There is possibly a better way, because it will let you build other python extensions with MinGW later, but I haven't gotten it to work. If anyone has a solution please let me know. As per this stackoverflow answer, you can edit C:\Python27\Libs\distutils\cygwincompiler.py. In the class Mingw32Compiler, change the __init__ method to remove the '-mno-cygwin' option. That didn't seem to fix the vcvarsall.bat error for me. I also tried to add setup.cfg file to distutils with the following:
   [build_ext]
   compiler=mingw32
-
Make sure it installed correctly. Back out of your current working directory (the Twisted source directory) into your TwistedEnv directory (alternately, to C:\ if you did not install virtualenv), and try importing twisted.
   cd ..
   python
At the prompt, type: >>>import twisted
>>>print twisted
If twisted installed correctly, importing the twisted module will not raise any exceptions. Also note that the twisted module that is loaded is the one in your source directory.
Twisted depends on zope.interface (says so on the Twisted website). If you scroll up in your console, you'll see that that setup.py downloaded and installed it for you. (see above screenshot)
Profit!!!
No seriously, this post is somewhat unfinished. I haven't explained how you'd work on different Twisted branches after running 'python setup.py develop', for instance, since I do not know the recommended way to do so. Someone at some point will probably write up something.


